Yay! My very first article at Blender Guru.
Take a look at every single Modifier in Blender with a brief explanation, ideas for usage and an animated example.
http://www.blenderguru.com/articles/blender-101-modifier-encyclopedia/
Showing posts with label blender. Show all posts
Wednesday, September 24, 2014
Wednesday, April 30, 2014
The Architecture Academy v1.5
After 7 months of a lot of work, The Architecture Academy v1.5 is about to start. Andrew Price just posted a teaser trailer.
I hope you enjoy them.
Just like last time, my duties were to model furniture that will be used throughout the workshop and will be available for download so subscribers can use them in their own projects.
Together with Reynante Martinez, a fellow furniture modeler and Rob Garlington our supervisor and also plant modeler, we've made more than 100 new models and even went back to update/fix a few models from v1.0 that needed an uplift.
I hope you enjoy them.
Labels:
3d,
architecture,
blender,
cycles,
guru,
modeling,
rendering,
the architecture academy
Sunday, July 14, 2013
Furniture animation from The Architecture Academy - Blender Guru
Andrew Price from Blender Guru just made a really nice animation of some of the furniture models I showed on my previous post.
Rob Garlington was the other artist that worked with me on the creation of this model pack. Some of the furniture are his and many (or all) of the trees on the pack. Some of them can be seen on his website.
Friday, July 12, 2013
Models made for The Architecture Academy - Blender Guru
Last year Andrew Price from Blender Guru, hired me to make some models for The Architecture Academy that just opened up this week.
The Architecture Academy is an online training portal packed with training videos, models and texture banks, ebooks and a forum ran by Andrew and is all related to the creation of architectural imaging. Topics such as modeling, texturing, interior and exterior design principles, scene and cameras setup, artificial and natural lighting and setups for Blender's Cycles rendering engine will be covered.
Below are some of the models I did for this workshop and that the attendees will be able to download and use.
All of the models were done entirely in Blender and the textures were painted in Blender and Gimp. They are both open source software and really capable of doing a professional job.
The Architecture Academy is an online training portal packed with training videos, models and texture banks, ebooks and a forum ran by Andrew and is all related to the creation of architectural imaging. Topics such as modeling, texturing, interior and exterior design principles, scene and cameras setup, artificial and natural lighting and setups for Blender's Cycles rendering engine will be covered.
Below are some of the models I did for this workshop and that the attendees will be able to download and use.
All of the models were done entirely in Blender and the textures were painted in Blender and Gimp. They are both open source software and really capable of doing a professional job.
Labels:
3d,
architecture,
blender,
blender guru,
cycles,
furniture,
materials,
modeling,
open source,
rendering,
texture,
the architecture academy
Friday, May 17, 2013
Human organs - test render from Maya
After finishing the modeling and texture painting in Blender, I imported the model in Maya via .FBX file format. The mesh looks great without flaws, even the materials names and basic settings were imported correctly.
Below is a preliminary test of the materials and lighting done in Maya.The next steps would be:
- Animate the heart and maybe lungs;
- Add particles simulation to show the flow of blood and malaria parasites entering the heart and flowing to the liver;
- Animate the camera.
I haven't figure out yet a few things regarding the particles animation, I could either look for realistic blood flow in sync to the heart beat, but the speed would turn out to be to fast and not really didactic. I could opt for just a steady flow, so its more understandable where the parasites are coming from and where they are heading.
Another issue that I will have to deal with it's the actual scale of the parasites and blood cells I will have to greatly exaggerate them so the viewer can recognize the liver and the actual parasites in the same shot.
I'll first try to pin down a camera animation with the voice over recording, and from there I'll try different scales for them and see what they look like in the final rendered image.
Labels:
3d,
blender,
Maya,
medical visualization,
mental ray,
rendering
Wednesday, May 15, 2013
Human organs - Heart and liver texture painting
After the modeling and sculpting, I painted the textures for the heart and liver. The textures on the lungs, stomach and intestines are just procedural textures that I just made up for this rendering.
Actually in the final animation, only the liver will be visible as a normal shading mode, the other organs will be rendered with transparencies. This project is about the life cycle of Malaria in the human body and in the mosquito. So in this case, with the semi-transparent organs, the camera will be showing the Malaria parasite flowing through the circulatory system into the liver.
Monday, May 13, 2013
Human organs - Modeling stages
This is just a quick post about today's work. About 4 hours of planing, searching for references and modeling in Blender. It is not anatomically correct but it will work for what I need.
The next step will be painting the textures which I'll use Blender again. The materials will have to be made in Maya for the final rendering.
Labels:
3d,
blender,
medical visualization,
modeling,
sculpting
Monday, May 6, 2013
Turma Cósmica - Online multiplayer games.
To finalize the production of the Turma Cósmica series, I'd like to present some details on the latest games that we produced.
Although they are only mini-games, they can be considered as the latest technology for us at the time. Instead of a physical media these are all played online on a web browser using Unity 3D engine and are multiplayer. For modeling and animation we used Blender, a free opensource graphics software. Many of the textures were painted in Blender as well and finalized in Photoshop.
Actually the test was for trying out if I could just model some basic building blocks and make many different tracks from these. Who knows? Maybe even a procedural build track, that a new one could be generated on every game play?
Although they are only mini-games, they can be considered as the latest technology for us at the time. Instead of a physical media these are all played online on a web browser using Unity 3D engine and are multiplayer. For modeling and animation we used Blender, a free opensource graphics software. Many of the textures were painted in Blender as well and finalized in Photoshop.
Next, are some concepts I made before the actual production.
First, I was just exploring the concept of a 3D board game, how it would look like in perspective, trying to find out problems that I could face later on like confused path, or things hidden form the viewer. I had to always keep in mind that these were for young children.
Next I was looking for how much I could push complexity on the path and amount of "houses" (landing places) for the board. My intention was to also use dices, because that is also part of the math subject that the student would be learning in class at this period. At this stage you can also see that I started to use some type of color identification on each house. These would represent the type of question the student would be asked.
So here is how the challenge would be presented. Instead of just adding up (math) the amount acquired of the 3 dices, the student would chose the sequence he would use the 3 dices. For example, the student threw the dices and got 3,2 and 2. If he has more ability in sciences, the could chose to use first one of the dices that had the value of 2 if that will help him to land on a house that is represented by the color of sciences. Later he can chose if it will use the dice of 2 again or the 3 and so on. So there is also strategy that will be used during the game play. On the final version of the game, there were also black colored houses that would be a surprise subject.
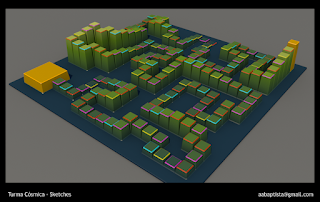
On the following image I represented the final look and feel of the game. You can see I chose the theme and the color pallet. Sketches like these were not supposed to look exactly like the final game just a general idea. Since I did at least 10 different variations of these in one day, not much care was used in the perspective or texture details, they should be done really fast. The first two images above were done in Blender, although it is a 3D software, it is amazingly fast to model, so for just basic layout, trying out different points of view it is a indispensable tool.
These sketches now are for the sand tracks race. Since these were all 3d games, I used Blender again to try out how the track would look in a perspective, its width, how the user would perceive it all.
This sketch I called something like high tech track, who knows, maybe this classic game here in Brazil should look more futuristic... how would kids from the future play this on a Space Station ? Maybe they could even have Storm Troopers uniforms for school? :-)
Actually the test was for trying out if I could just model some basic building blocks and make many different tracks from these. Who knows? Maybe even a procedural build track, that a new one could be generated on every game play?
Then I got melodramatic and decided to go back to the old sand box style track. Remember, the time to get crazy idea is now, when you're just doing concepts. It is better to try something silly and then give up on it now than later on the production process when there is not a whole team working in it. Specially if there are programmers involved, they hate changes :-).
Now I went to sketches in Photoshop where I'm starting to define color pallets and some basic GUI (graphical user interface ) layout.
The more refined and revised GUI layout. You can see on this one that I had also checked to see how the GUI would adjust to different screen aspect ratios, that is what the subtle darker bands are for on each side of the image. The smaller area is a 4:3 (letter box) aspect ratio found on older TVs and computer monitors and the wider one is 16:9 (HD video standard) found on more modern LCD monitors or some smart phones and tablets.
Monday, March 26, 2012
Mouth shapes study.
These are some mouths shapes studies I did for a mockup introductory alphabet lessons for preschool kids. They are supposed to show the differences between vows and consonants. Where, in the vows pronunciation, the air flows out from the mouth without any obstruction.
While consonants, when pronounced are obstructed by lips, tongue or teeth.
Labels:
2d,
3d,
animated gif,
animation,
blender,
character,
mouth shapes
Tuesday, December 13, 2011
Modeling and materials exercise II - Egyptian chair
I should call this more a materials and texture exercise because that is where the complexities are, the modeling was relatively simple although it was a little hard to get the proportions, I only had one picture as reference.
Modeling and rendering were all done in Blender. Photoshop was used for making the bumpmap for the side panels.
Friday, December 2, 2011
Modeling and materials exercise - Victorian Footstool
This is the result of a modeling exercise I did recently in Blender 2.6. One of my attempts was to do some organic modeling on the dragons (in my case) or gryphs from the reference image further below. I call mine dragons because there are still missing details that would make them look more like cats, such as the tail, and chest and head fur and also a little bit of the proportions on the head. Since most of the modeling I do at work are low poly for games, I wanted to try out the Blender's sculpting tools on these, and also in the cushion and the golden emblem.
The materials were all setup thru the use of material nodes. Two bitmaps for the wood texture, one for the diffuse and specular map and another for the bump map. The cushion is using a Voronoi procedural on the bump map as well.
The original rendering was done using Cycles inside Blender with full global illumination and depth of field. In the screenshot below you can see the basic studio setup. One infinite plane and four area lights with 2 of them contributing to the overall illumination and 2 acting more like reflection planes.
In this screenshot you can also see the complexity of the wood material. The other materials are relatively simple phong and metal setups.
Afterwards I reduced the image to 720p and did some color correction in Photoshop.
Labels:
ambient occlusion,
blender,
cycles,
modeling rendering,
victorian
Wednesday, October 26, 2011
Quick test with Cycles render engine.
This is a quick and dirty test of the Turma Córmica and Cycles. I'll try to post more details about the setup and some overall fine tunes on the meshes, materials and poses on a next post, these meshes are optimized for the game engine not a full render.
I think these guys would look great as actual mini figures.
Labels:
blender,
cycles,
educational games,
rendering,
turma cósmica
Saturday, February 19, 2011
Mon - fur test
Well, after a long time I have finally something new to post.
This is Mon (monkey).
What started out as a quick and dirty test for Blender's fur. It actually ended up looking better than I thought so It was worth a little more effort at the end. But if I new that I was going to like it so much I would have probably done some steps differently.
Concept
The idea was to replicate a photograph I've seen of a small monkey on a tree branch, I thought that it would be a perfect example to try out the fur engine.
Modeling
I started the process by doing a very rough 3d sketch of a monkey in the classic T pose so I could rig it and then change it's pose as I wished, that way I could get the proportions a bit easier. Once rigged and posed, I separated the head mesh and sculpted the details only on the head. I've never even subdivided the rest of the body mesh for the final rendering since it was going to be all covered up. This process was so quick that I think I did it in less the a hour. After that I deleted the bones and made some final adjustments pulling the vertices around, specially because the rigging and skinning was so rough that I ended up having some bad triangles, etc.
Fur
The process for the fur was pretty straight forward, but since I was learning while making it I did had to go back and forth a few times. But most of all it all went well, Blender's fur tool are great for adjusting it's length, shape, combing, kink, etc.
At some point I reatached the head to the low poly body because I wasn't understanding how the fur shading was working, and for some reason there seemed to be a lack of shadow from the head's fur to the body's fur. But it was not, maybe it was the light setup that I had.
A few tips:
- I separated the fur according to vertex groups for easier grooming, like left arm, right arm, left leg, right leg, torso, tail and head, that way I could turn them on/off so I wouldn't groom the wrong part by accident. It may also help on "heavy fur" models, but in my case i had about 50 to 80 thousand strands on each of these parts and a lot of time I had all of them (~600.000) turned on and had no visual lag on the viewport, only when adding or removing strands, probably because Blender was trying to rearrange their children position and interpolation.
- Another useful feature was the ability to paint influences like fur density, length, clump, kink and roughness.
Looks
I painted the face texture directly inside Blender, and also spent no more than 15 minutes unwrapping and painting it , that can be easly noticed on the quality of the painting below. :-)
I used a sub surface scattering material and most of the texture's imperfection were not noticeable anymore.
![]() |
| Beautiful mapping :-) Can you spot the nose texture repeating on his left ear? |
The final render was done with 2 area lights and no global illumination or ambient occlusion, so it was really fast, about 6 minutes at 1920 x 1080 with 16 samples for anti aliasing on my Intel Core2duo.
Cheers,
Andz
Subscribe to:
Posts (Atom)


