Páginas

Tuesday, December 13, 2011

Modeling and materials exercise II - Egyptian chair


I should call this more a materials and texture exercise because that is where the complexities are, the modeling was relatively simple although it was a little hard to get the proportions, I only had one picture as reference.


Modeling and rendering were all done in Blender. Photoshop was used for making the bumpmap for the side panels.

Friday, December 2, 2011

Modeling and materials exercise - Victorian Footstool


This is the result of a modeling exercise I did recently in Blender 2.6. One of my attempts was to do some organic modeling on the dragons (in my case) or gryphs from the reference image further below. I call mine dragons because there are still missing details that would make them look more like cats, such as the tail, and chest and head fur and also a little bit of the proportions on the head. Since most of the modeling I do at work are low poly for games, I wanted to try out the Blender's sculpting tools on these, and also in the cushion and the golden emblem.


The materials were all setup thru the use of material nodes. Two bitmaps for the wood texture, one for the diffuse and specular map and another for the bump map.  The cushion is using a Voronoi procedural on the bump map as well.
The original rendering was done using Cycles inside Blender with full global illumination and depth of field.  In the screenshot below you can see the basic studio setup. One infinite plane and four area lights with 2 of them contributing to the overall illumination and 2 acting more like reflection planes.


In this screenshot you can also see the complexity of the wood material. The other materials are relatively simple phong and metal setups.
Afterwards I reduced the image to 720p and did some color correction in Photoshop.

Wednesday, October 26, 2011

Quick test with Cycles render engine.

This is a quick and dirty test of the Turma Córmica and  Cycles. I'll try to post more details about the setup and some overall fine tunes on the meshes, materials and poses on a next post, these meshes are optimized for the game engine not a full render.


I think these guys would look great as actual mini figures.

Tuesday, May 10, 2011

5 Centimeters Per Second - A painting in every scene.

Yesterday me and my wife watched 5 Centimeters Per Second.  A beautiful anime directed by Makoto Shinkai  that tells the story of Takaki and how he has dealt with relationships along his life.

I was once asked by a fellow friend and coworker, why did I prefer to do backgrounds and sceneries instead of "cool" characters and animations.  I would probably have had a better answer by just showing him this anime, and what I'd be trying to achieve.

While watching it, I couldn't stop noticing how every shot was beautifully composed. Although some of them had no dialog, they had to exist, they told a story by them selves.  I wold like to congratulate every one involved in this project, and I wish to be able to one day participate in such talented team of artists and maybe learn a bit.

Bellow are some random screen shots of the movie.  All images belongs to Media Factory.


Thursday, February 24, 2011

Turma Cósmica

Loosely translated to english as "Cosmic Bunch" is the first set of educational computer games for children that I have worked on, and it was released this week here in Brazil.


My duties in the production were:
  • Game design for all 2D games;
  • Programming for about 60% of the 2D games;
  • Sound editing for all of the 2D games;
  • Illustrations and painting for the 2D and some 3D games;
  • Modeling and texturing for some of the 3D games;
  • Package design.
Below are some screenshots, and background illustrations with a brief description of my acting in each.


*Game design, programming and illustrations (except the character).


* Concepts, game design and background illustrations.


* Game design and illustrations.


*Game design and programming.


*Game design, programming and backgrounds.


*Game design and programming


*Concepts, slideshow painting, 3D modeling and texturing.


*Package design and rendering.


**All images belong to PUC-PR and Editora FTD

Sunday, February 20, 2011

Updates

I uploaded more images in the 2D and 3D galleries.

Saturday, February 19, 2011

Mon - fur test

Well, after a long time I have finally something new to post.

This is Mon (monkey).


What started out as a quick and dirty test for Blender's fur. It actually ended up looking better than I thought so It was worth a little more effort at the end. But if I new that I was going to like it so much I would have probably done some steps differently.

Concept

The idea was to replicate a photograph I've seen of a small monkey on a tree branch, I thought that it would be a perfect example to try out the fur engine.


Modeling

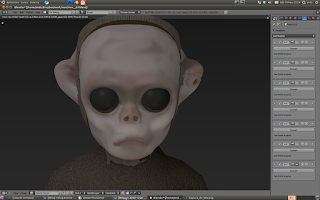
I started the process by doing a very rough 3d sketch of a monkey in the classic T pose so I could rig it and then change it's pose as I wished, that way I could get the proportions a bit easier.  Once rigged and posed, I separated the head mesh and sculpted the details only on the head.  I've never even subdivided the rest of the body mesh for the final rendering since it was going to be all covered up.  This process was so quick that I think I did it in less the a hour.  After that I deleted the bones and made some final adjustments pulling the vertices around, specially because the rigging and skinning was so rough that I ended up having some bad triangles, etc.


Fur


The process for the fur was pretty straight forward, but since I was learning while making it I did had to go back and forth a few times. But most of all it all went well, Blender's fur tool are great for adjusting it's length, shape, combing, kink, etc.

At some point I reatached the head to the low poly body because I wasn't understanding how the fur shading was working, and for some reason there seemed to be a lack of shadow from the head's fur to the body's fur. But it was not, maybe it was the light setup that I had.

A few tips:

  • I separated the fur according to vertex groups for easier grooming, like left arm, right arm, left leg, right leg, torso, tail and head, that way I could turn them on/off so I wouldn't groom the wrong part by accident. It may also help on "heavy fur" models, but in my case i had about 50 to 80 thousand strands on each of these parts and a lot of time I had all of them (~600.000) turned on and had no visual lag on the viewport, only when adding or removing strands, probably because Blender was trying to rearrange their children position and interpolation.


  • Another useful feature was the ability to paint influences like fur density, length, clump, kink and roughness.


Looks

I painted the face texture directly inside Blender, and also spent no more than 15 minutes unwrapping and painting it , that can be easly noticed on the quality of the painting below. :-)


I used a sub surface scattering material and most of the texture's imperfection were not noticeable anymore.

Beautiful mapping :-)
Can you spot the nose texture repeating on his
left ear?


The final render was done with 2 area lights and no global illumination or ambient occlusion, so it was really fast, about 6 minutes at 1920 x 1080 with 16 samples for anti aliasing on my Intel Core2duo.

Cheers,
Andz