Páginas

Showing posts with label rendering. Show all posts

Monday, September 3, 2018

Activating this blog again.

I has been almost 4 years since my last post on this blog. Although I have been away from public CG activity, I'm still rockin' hard on the backstage. 

It's almost time for me to celebrate 30 years of involvement in Computer Graphics production. From the most artistic end to the other extreme of scientific visualization. Swapping from one end to another kept me motivated whenever I felt tired or lost during different stages of my life all these years.

In these last 4 years that I have not updated anything on this blog, I had the chance to spend some more time abroad. And all the extra activities involved into living in foreign countries besides the new workplace kept me so busy that I just did not have the time to keep it up.


After finish my work for Andrew Price at Blender Guru's Architectural Academy, I moved to Vienna, the capital of Austria, to work on the production of a CG animated series called Talking Tom and Friends. A really cool (and successful) production that is up to the third season by now and with some episodes achieving more than 30 million views. It started out as an YouTube only show but eventually it made to some TV stations and currently is being shown in Netflix but I'm not sure if it is world wide.


In this production I acted as the Lead Lighting and Rendering Artists, where I was responsible for:


  • supervising other artists on my department;
  • preparing lighting keys following guides from art directors and concept artists;
  • lighting and rendering sequences;
  • negotiating workflows and deliveries with other departments and directors.

The main production tool in our department was SideFX Houdini and Mantra, its internal renderer. We received our scenes data from the Animation department as Alembic files.

From our department, we would send the rendered images as multi-layered EXR files to the Compositing team together with a slap comps for their reference.

I had the opportunity to meet many new artists, old colleagues, and CG veteran legends like Ron Thornton. Vienna is an amazing city that just breathes art on every little corner. And it is of an inclusive type, where just like the Habsburg ideal where it should be accessible for all, from the royalty to the peasants, there was not a single day on that city where you could not get in contact and live its artistic spirit.

To visit Vienna one day was one of my dreams and I will be forever grateful for the opportunity that I had to live in this city for almost two years.

Wednesday, April 30, 2014

The Architecture Academy v1.5

After 7 months of a lot of work, The Architecture Academy v1.5 is about to start. Andrew Price just posted a teaser trailer.


Just like last time, my duties were to model furniture that will be used throughout the workshop and will be available for download so subscribers can use them in their own projects.

Together with Reynante Martinez, a fellow furniture modeler and Rob Garlington our supervisor and also plant modeler, we've made more than 100 new models and even went back to update/fix a few models from v1.0 that needed an uplift.

I hope you enjoy them.

Sunday, July 14, 2013

Furniture animation from The Architecture Academy - Blender Guru

Andrew Price from Blender Guru just made a really nice animation of some of the furniture models I showed on my previous post.


Rob Garlington was the other artist that worked with me on the creation of this model pack. Some of the furniture are his and many (or all) of the trees on the pack. Some of them can be seen on his website.

Friday, July 12, 2013

Models made for The Architecture Academy - Blender Guru

Last year Andrew Price from Blender Guru, hired me to make some models for The Architecture Academy that just opened up this week.

The Architecture Academy is an online training portal packed with training videos, models and texture banks, ebooks and a forum ran by Andrew and is all related to the creation of architectural imaging.  Topics such as modeling, texturing, interior and exterior design principles, scene and cameras setup, artificial and natural lighting and setups for Blender's Cycles rendering engine will be covered.

Below are some of the models I did for this workshop and that the attendees will be able to download and use.

All of the models were done entirely in Blender and the textures were painted in Blender and Gimp. They are both open source software and really capable of doing a professional job.


Friday, May 17, 2013

Human organs - test render from Maya

After finishing the modeling and texture painting in Blender, I imported the model in Maya via .FBX file format. The mesh looks great without flaws, even the materials names and basic settings were imported correctly.

Below is a preliminary test of the materials and lighting done in Maya.The next steps would be:
  • Animate the heart and maybe lungs;
  • Add particles simulation to show the flow of blood and malaria parasites entering the heart and flowing to the liver;
  • Animate the camera.


I haven't figure out yet a few things regarding the particles animation, I could either look for realistic blood flow in sync to the heart beat, but the speed would turn out to be to fast and not really didactic. I could opt for just a steady flow, so its more understandable where the parasites are coming from and where they are heading.

Another issue that I will have to deal with it's the actual scale of the parasites and blood cells  I will have to greatly exaggerate them so the viewer can recognize the liver and the actual parasites in the same shot.

I'll first try to pin down a camera animation with the voice over recording, and from there I'll try different scales for them and see what they look like in the final rendered image.

Tuesday, December 13, 2011

Modeling and materials exercise II - Egyptian chair


I should call this more a materials and texture exercise because that is where the complexities are, the modeling was relatively simple although it was a little hard to get the proportions, I only had one picture as reference.


Modeling and rendering were all done in Blender. Photoshop was used for making the bumpmap for the side panels.

Wednesday, October 26, 2011

Quick test with Cycles render engine.

This is a quick and dirty test of the Turma Córmica and  Cycles. I'll try to post more details about the setup and some overall fine tunes on the meshes, materials and poses on a next post, these meshes are optimized for the game engine not a full render.


I think these guys would look great as actual mini figures.

Saturday, October 30, 2010

Blender house revision.

Here is a new try at rendering the house I made as a test drive for Blender's rendering engine.


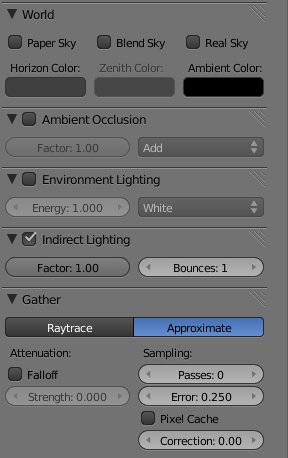
I had to render it in separate passes to composite it out in Photoshop. Also, the ambient occlusion pass was a complete re-render, because if I understood right, to be able to use the indirect illumination inside Blender, I was only allowed to use approximation gatherer. 


 And with that I wasn't satisfied with the ambient occlusion pass, as it was to blurry in my oppinion. So for the ambient occlusion pass I used the raytrace gatherer. It's crispiness was crucial for me to achieve the fine details in the corners of the mesh.


Things I would like to have in the renderer:
  • Separate controls for ambient occlusion, environment lighting and indirect illumination.
  • Pixel displacement. The rock wall around the garden still looks flat only relying on bump map and diffuse texture map. The ambient occlusion is not calculated considering the bump map.


If I continue refining this scene, i should:
  • Work on some textures like the asphalt, it has a bad tiling. 
  • Try a new approach to the grass, maybe give a try at fur.
  • Add more mesh details, maybe on the rock wall and try vertex displacement.
I'd love to hear some comments on how can I improve this scene in Blender.

Cheers,
Andz


Wednesday, October 27, 2010

First two Blender renderings.

These are the first two renderings of my tests in Blender.

First one is Tea Box, I was still learning the modeling and UV mapping tools. I was still having a hard time understanding the materials and textures at this time. There are some color bending on the background that I think is caused by a bad smoothing on the infinite plane.  If I spend time again on this file, I would redo the two tea bags on the right.


The second image is more recent, I just finished the rendering last night, but I'm still not 100% happy with the illumination and colors. Right now it has to much contrast, maybe because of the lack of indirect illumination. I also think that the colors don't look right, it looks almost like a painting.


  I'll be definitely trying a new rendering on this one.

So, things that I'm still trying to adjust my self in Blender:
  • Complex scenes organization;
  • Materials;
  • Lighting;
  • Rendering parameters.